Tuesday, October 30, 2007
Basic Grey Snow Much Fun
Another Christmas Card with Non traditional colors. This snowman is long retired but still one of my favorites. The base of the card is Soft Sky. The next layer is Basic Grey with the Snow jumbo wheel rolled across in Going Grey ink on top. The bottom of the grey paper has the little snowflake from Perfect Presentation stamped on it in Going Grey. Next is a strip of Basic Black that has been paper pierced along the edges. I layered a piece of designer paper from the Soft Sky Prints collections on the black piece. The snowman is stamped on Whisper White with Basic Black ink and layered on Real Red. I colored around the edges with Going Grey marker to highlight. I also chalked an oval around the bottom of him with a mask made from our oval punch. The hat and heart are paper pieced with paper from the Winter Bright Simply Scrappin Kit. His nose and scarf are colored using markers. The final piece is the little black scallop circle with the snowflake from Season of Joy stamped in Soft Sky on Whisper White. This is hung from basic black grosgrain ribbon with silver cording. I added a piece of red polka dot ribbon and a red stone to finish. I hope you enjoyed.
Monday, October 29, 2007
Another Stampin Up Special -- Limited Time
Sunday, October 28, 2007
It's a Wrap.
I tried all day yesterday and bit on Saturday to upload this card but Blooger what not being very cooperative. Oh well, at least it is working this morning. This card is so pretty in person. The background is actually our Blizzard Wrapping paper. The angel is from Holy Triptych and stamped on Shimmery White card stock. The saying is from Star Studded Season and stamped on Bashful Blue card stock in Chocolate Chip. All three of these items are found in the Holiday Mini which runs till the end of November. I colored the angel with a bashful blue watercolor crayon. Here hair is colored with the aqua painter and color from the lid of the Chocolate Chip pad. I added dazzling diamonds to the wings with the SU glue pen. Very pretty in person.
Saturday, October 27, 2007
Sneek Peek at November SU Promotion
During the month of November, purchase three packs of our Designer Series Papers and receive one pack absolutely FREE!!! Yep, that read on pack free! The paper packs are $9.95 so that is a substantial savings. You all know that I have begun to use these a ton so I will be stocking up on a few of my favorites before the retirement list -- Yikes that sounds weird this time of year. Don't forget the new catalog is due out in January. So much to buy yet, lol!
Our Designer Series Papers are 12x12, patterned on both sides and come twelve sheets to a pack. You can find these papers on pages 170-173 of the Fall-Winter Catalog and pages 12 and 19 of the Holiday Mini Catalog.
Here is a list of the papers and their coordinating card stock and ink colors: I have this printed out and hanging near my paper in my studio- you may want to do that too.
Outlaw - Chocolate Chip, Really Rust, Sage Shadow, Very Vanilla
Brocade Backgrounds - Always Artichoke, Chocolate Chip, Old Olive, River Rock
Fall Flowers - Old Olive, Really Rust, Sahara Sand, Soft Sky
Linen Prints - Always Apricot, Cameo Coral, Close to Cocoa, Old Olive, Pink Passion
Porcelain Prints - Blue Bayou, River Rock, Wild Wasabi
Le Jardin - River Rock, Soft Sky, So Saffron, Very Vanilla
Uptown - Almost Amethyst, Basic Gray, So Saffron, Wild Wasabi
Wintergreen - Always Artichoke, Certainly Celery, Sage Shadow, Soft Sky
Flowers for You - Certainly Celery, Lovely Lilac, Regal Rose, Tempting Turquoise
Petals & Paisleys - Certainly Celery, Taken w/Teal, Rose Red, Pretty in Pink, So Saffron
Creepy Crawly - Basic Black, More Mustard, Pumpkin Pie, Really Rust
Notations No. 2 - More Mustard, River Rock, Very Vanilla, Wild Wasabi
Charbon - Basic Gray, Very Vanilla
Cerise - Real Red, Very Vanilla
Dashing - Old Olive, Real Red, River Rock, Very Vanilla
Cutie Pie - Bashful Blue, Basic Black, Certainly Celery, Rose Red, So Saffron
Darling Doodles - Brocade Blue, Groovy Guava, Rose Red, Wild Wasabi
Prints - These papers come in twelve patterns of one color per pack:
Lovely Lilac
Almost Amethyst
Soft Sky
Tempting Turquoise
Brilliant Blue
Blue Bayou
Always Artichoke
Old Olive
Certainly Celery
River rock
So Saffron
More Mustard
Close to Cocoa
Pumpkin Pie
Groovy Guava
Rose Red
Apple Cider - Close to Cocoa, River Rock, Really Rust, Wild Wasabi
Holiday Harmony - Always Artichoke, Purely Pomegranate, River Rock
So let me know what papers you want for free! I LOVE that word!
Friday, October 26, 2007
Blogger's Challenge
This is a close up of the top of the tree.
All of the designer paper used is from the Winter Brights Simply Scrappin kit. I also used Real Red, Bashful Blue and Wild Wasabi card stock to alternate. The garland and ornaments have been in my craft room for years -- nice to finally use them. As was the paper tree I started with. All of the papers are just folded in a loose loop and stapled together before attaching to the form. This project is usually done with a Styrofoam cone which would have been much easier because you could just use pins to adhere the paper loops. This took about 7 different adhesives, lol! There were a lot of uneven areas on the tree as it was really textured to start with.
Here is a link for where I got the idea. I did not use these cones though. My tree is two and a half feet hight!
Sunday, October 21, 2007
Season's Greetings
Supplies used: Winter brights paper,Wild Wasabi card stock, Real Red card stock, Whisper White card stock that has been cuttlebugged with the swirls, scallop punch, small circle punch , small flower from Season of Joy, red sticklers, Wild Wasabi ink, Basic Black ink and saying from Many Merry Messages. The wreath is created twice and then stuck together with the white cardstock in between to suspend the wreath. This also makes it look nice from the inside. Thanks for stopping by and checking out my blog today!
Friday, October 19, 2007
In Everything Give Thanks.
Stamps
one floral image (stamped once or generation stamping - repeated stamping without re-inking)
one swirly type stamp
sentiment (optional)
Paper
solid or patterned paper
limit your layers
Embellishments
ribbon
Quick Tools (Optional)
punches
sponges
paper piercer
Cuttlebug for dry embossing
I decided to cut a window in the front of the card. The base of the card is Sky Blue textured card stock. I cut a square window in the front of the card and stamped the swirl from Season of Joy on all four sides in Blue Bayou. I added little hand drawn doodles around the window with a black marker. The words are from Absolutely Fabulous and are stamped in Blue Bayou. I added a line of pierced holes from the word over toward the other side. The wide ribbon has been in my stash for years! No clue where it is from. On the inside of the card Is a layer of Whisper White that I stamped the flowers from the retired set Happy Harmony in Blue Bayou and the saying -- In Everything Give Thanks -- in black. One more thank you card done!
Photo Card -- Blogger's Challenge
Here is the card shown closed.
This is a close up of the "card" part. So easy to work with, kind of like trading cards.
These will certainly be easy to whip out -- even if you change the image on every card you make. Did I tell you I love this idea!
This picture shows how the card opens.
Supplies used for the card. Real Red 12 x 12 textured card stock is used for the base. I also used Wild Wasabi, Summer Sun and Whisper White cards stock. The image is from the hostess set Perfect Presentation. I stamped it on the white, wasabi and real red and then cut it out and pieced it together. The star, saying and the swirl are all from the Season of Joy set from the Holiday mini. I also used a saying from Many Merry Messages on the inside. I kept it simple so that the picture will be the real focal point. Hope you enjoy. I am gonna have to figure out how to get one seven year old two dogs and a cat to sit still for pictures, lol.
Thursday, October 18, 2007
Just Believe
Another one of those cards from last year. I created it, cut the paper and then never made it. The challenge on Splitcoaststampers today was to use wood! Yea, I pulled out the materials and made 11 of these in no time at all. The base of the card is Real Red. Next layer is Whisper White and has the retired Polar Bears stamped in Black along with the snowflakes. I only colored the scarves and ground because I wanted to keep it simple. The wood star is painted yellow and then has thin red ribbon wrapped around it. The word Believe is stamped in Real Red. It is from the retired Hope Is set. Got to love fast and fun cards!
Wednesday, October 17, 2007
One Sketch Two Cards
Feels good to be back in the studio creating. I have lots of thank you cards to make for all the people that helped me with the Crop Walk. Here are my first two. Both used the sketch above from Splitcoaststampers. Hope you like them.
This first card is so bright and cheery I just love it.
I used the Cutie Pie designer series paper along with Rose Red and Bashful Blue card stock. The first layer of paper that is on the Real Red card base is the polka dots. I stamped thanks from the retired Autumn Leaf Prints set in black randomly over the dots. Next is a piece of Bashful blue card stock that has a slight scallop edge on the top. I also cut the next layer of designer paper with the same scallop edge. I did not line them up perfect because I liked this look better. I added a strip of saffron strip of scallop sticker from the Friends and Family simply scrappin kit along the bottom of the designer paper. Then I did some paper piercing on the blue line along the bottom of the strip. The focal image from Sidekick Sayings is stamped on Whisper White and colored in with markers. I highlighted the words grateful and happy. Then it is layered on a piece of Rose Red card stock that has been paper pierced on both sides. I finished it off with more of the So Saffron sticker strip. The entire focal image is popped up on dimensionals. I love the colors.
This second card is done with the retired set Reverse Prints. I embossed the image with dark brown powder on River Rock. It is then layered on Old Olive and then Chocolate Chip. Other items used are the square steps punch, brown brads,the dry brush jumbo wheel, versa mark, and Simple Sayings II. Thanks for stopping by.
Tuesday, October 16, 2007
Phewwwww, thank God that is done.
This is actually a tri-fold card. The white opens in the opposite direction as the front of the card. I used the Doodle this and Doodle that sets. I am not going into all the details tonight. Maybe I will update this tomorrow when I am not so tired. If you have any questions feel free to post them here and I will answer promptly. Thanks for stopping by and I promise to have something new tomorrow.
Thursday, October 11, 2007
Blogger Challenge: Week 16: Ornaments
Don't forget to look at my side bar to find the links to all the other players. This should be a fun one. Thanks for stopping by today.
Snowflake Ornament Tutorial
It is very hard to get a good picture of this because I have no where to hang it that the back ground is not a mess, lol. So just remember that I don't have time for housework and yard work if I am gonna be stampin for you guys all the time, teehee.
Supplies needed for this project (not all are shown in the picture) 6 squares of double sided designer paper (or white for traditional snowflakes). All squares must be the same size. Mine are 6 inch squares of the Wintergreen designer paper. 6 small scallop circles (from the Stampin Up! scallop circle punch) of the same or coordinating paper. Scissors, cording, scotch quick-dry adhesive, ruler, pencil and stapler. Beads are optional.
We will begin with the large part of the ornament -- the snowflake. Take one of your square pieces of of paper and fold it in half from corner to corner. Keep the lighter side showing so that you can make pencil marks for cutting.
Now fold it in half again so that you have a small triangle as seen below.
Next you will need to open it back to the original fold.
Place your paper with the folded edge on top and the point on bottom Now measure from the center point on top to the outer straight edge that does not have a fold on it. Since my paper is 6 x 6 square I found the spot that measures 3 inches from center to edge. See below.
I marked small lines at 1 and 3/8, 1 and 7/8 and 2 and 3/8. The lines must go from crease to crease.
Using your markings you will need to draw a straight line from the crease that is in the middle of your paper to the top folded edge. When you have the lines drawn fold your paper back to the way it is shown in the picture below. The lines will only be on one quarter of your paper.
Next you will need to cut on the lines you just drew. But the trick is to start at the end that opens and cut almost up to the solid fold. You need to leave about 1/4 inch before the solid fold line. Look at photos below.
This is what your paper will look like after you cut your three lines.
Now unfold your paper.
This is what your paper will look like when it is fully open. If you have made it to this point you have completed the hardest part of the project. Unfortunately you will need to do this and the following steps to all 6 square pieces of paper. I suggest you continue on with the next few steps before cutting any more of your squares though so you are sure your cuts are right.
Now with your paper open in front of you you will want to grab the two corners of the inside square and roll them to meet each other as seen below.
Add some adhesive to one corner and attach together. This adhesive dries fast and stays put!
Here is what your paper should look like now. So far so good?
Now flip your paper over so that the first loop is now facing down. See below.
Grab the two corners of the next square and bring them together in this direction.
Again you will need to apply adhesive and attach the corners together.
Flip your paper again and do it with the next two corners. When all the corners are alternating and attached set aside and do the same thing to your other five squares.
After that you will have six separate "arms" for your snowflake ornament. Take the corner of three of your "arms" and hold them together to create a point as shown below. Use your stapler to place a staple on this point to keep the tree "arms" together. Do the same to the other three "arms"
This is what you will have when you have finished the previous steps. (below)
Carefully attach the two points that are stapled together and add one more staple to that to form the middle of your snowflake ornament.
Last step to this part of your ornament is to staple where the 6 "arms" meet. This will help the snowflake to keep it's shape.
Pick a point to be the top of your snow flake and punch a small hole in it to string some cording to use for hanging it. Then punch a small hole in the bottom to prepare for the small ornament that attaches to the bottom.
Set your snowflake aside for a few minutes and bring over your 6 small scallop circles of matching paper. This will create the mini ornament that is hanging on the bottom of the snowflake. Fold each scallop in half alternating the patterns as seen below.
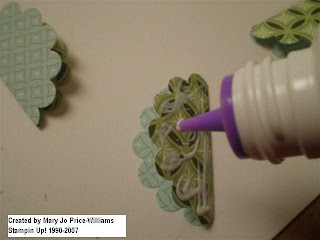
Begin to glue each scallop to an alternating scallop. As you attach one you will fold it over and add the next one right next onto the others.
Here is a picture of the process.
Before attaching the last scallops together I took a piece of cording and tied a knot in one end. I added two coordinating beads and then strung it across the scallop ornament and through the hole on my snowflake and then back down to the mini scallop ornament. I taped the cording to the mini scallop ornament and then glued it together.
Wednesday, October 10, 2007
Criss Cross Challenge
Supplies used:
Paper: Bashful Blue, Basic Black, So Saffron, Certainly Celery and Rose Red card stock. Cutie Pie designer series paper.
Ink: Rose Red, Versa Mark
Other. paper piercer and mat, black marker, rose ribbon, wave cutting blade, black embossing powder, dimentionals, paper snips, corner rounder and round tab punch.
Stamp sets: Simply Said, Word on Word and Doodle This.
Criss Cross Cards
These beautiful cards were created by three of my friends who just happen to be club members. Didn't they do a great job. I cut the main pieces for them and they all embellished as they chose. I think they all turned out great. Super job Michelle, Laura and Jen!
Tuesday, October 9, 2007
AJ and Steph's Wedding Card
This card was made for friends of mine for their wedding day. I love the colors and I so love the retired set Roses in Winter.
Papers, Pumpkin Pie, Apricot Appeal, Ruby Red and Vanilla. Ink same plus black and Old Olive. Sorry for the lame description but I am way way way tired. Every other word is being spelled wrong.