Monday, December 31, 2012

Brand New Challenge Blog for Latenightstampers!

We are so excited to share the grand opening of our brand new challenge blog for Latenightstampers everywhere!  Our group has been doing challenges for a long time now and we have often struggled with how to keep everything in one place--well, no more!  We now have our very own blog.

LNSChallenges

We would love for you to hop on over and check it out.  We are still fixing a few quirks but it is ready for you to play along!  Come on over and play along.  Don't forget to follow us using your favorite method then you will get the challenges delivered right to you!
 
Our first challenge also has a prize attached so be sure to head over and check it out.
 
Challenge 204 -- Snowflakes
 
Now that Christmas is over it is time to send out those Thank you cards.  I decided to take some left over cards pieces and turn them into thank you cards for my son to use.  Of course I chose to use snowflakes so tht it would fit our first challenge.


I used some old felt snowflakes that have been retired for a bit now but I still have some. 
The colors are Cherry Cobbler, Lucky Limeade and Early Espresso
Hope you find time to play along and check out the rest of the teams projects too.
 
Happy New Year's Eve Day!
Mary Jo
 

Tuesday, December 25, 2012

Merry Christmas from our home and the Try Stampin' on Tuesday Team too!

I hope that all of your Christmas wishes came true today.  May you day be filled with much joy, laughter, love and family!  We have a house full of SICK people.  My 12 year old has slept for over 36 hours now and is really feeling bad and of course since I spent so much time by his side I too am sick!  I think I have slept at least 19 hours now too.  Crazy!  

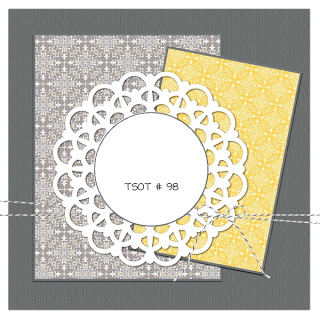
We have a great sketch for you today!  Remember you have the full week to play along--can't wait to see what you come up with.  Here is the sketch...

 
Now I must say I am not normally a fan of square cards and if you check out the other designer team samples you will see some great ways of changing this sketch to the regular size.  I chose to stay with it and go in a direction I am not comfortable with all the way around.  Kind of a vintage style--not my ususal but I think it turned out pretty good--it is good to strethch yourself sometimes.


I used lots of layers and textures and of course some bling.  The colors are Real Red and Early Espresso along with Very Vanilla.  This is my fist time using this set from the Holiday mini--so busy with Christmas designs.  The stamp set is called Affection Collection

Well, I guess I am going back to sleep for a bit!  My head and chest hurt.  Come on over and play along with us--or at the very least take a look at all the beautiful cards the rest of the team designed.

Try Stampin On Tuesday Challenge 98

 
Merry Christmas!
Mary Jo

Tuesday, December 18, 2012

Try Stampin on Tuesday!

Welcome to another week of Try Stampin' on Tuesday.  What a great sketch we have for you to play along with this week! 


I decided to move on from Chrismtas and make a New Year's card.


Isn't this a fun card.  I used lots of tiny little pearls to make the fizz!  Love how easy and cute it was. 

Stamps: Cheers to You
Paper: Pear Pizazz, Riding Hood Red, Whisper White, Basic Black, DP
Ink: Basic Black, Pink Pirouette
Other: markers, sparkle paper, pearls, circle punch, ribbon, scallop circle punch, modern label punch.

Hope you find time to play along--visit the challenge blog for the other fabulous samples and to play along  HERE
Mary Jo

Monday, December 17, 2012

A Few of My Favorites

I thought I would share of few of my favorite sketches from this year -- these are from the last six months.  I did not think I could choose from ALL the sketches--so thought I would just go back six months for now. 


If you would like more details on any of these you can find them by clicking on the sketch or sample.  Which is your favorite???  I think I was just looking for samples that were NOT Christmas, lol. 

Happy Monday
Mary Jo

Sunday, December 16, 2012

All I want for Christmas is...

A desk top computer that dosen't have an attitude!  Not sure what the deal is but every few months my desktop--which has all the programs and attachments for my posting--goes crazy on me.  I really don't want to spend money right now on a new desk top computer since I have my laptop and we have quite a few other computers in our home.  BUT--all of my posting and editing tools are on there.  I was able to get it to cooperate long enough to get three cards edited!  Good thing too cuz the Try Stampin On Tuesday sketch was due today!  Just in time.  So since I was able to get a few cards edited I am posting from my laptop.  I still have quite a few Christmas cards to share..althought I am so "done" with them you may still need ideas.  Today's card is actually using a retired stamp set that I always loved.  Do you recognize it??


Stamps: Miracle of Christmas and Heard from the Heart
Paper: Early Espresso, Lucky Limade, Cherry Cobbler, Whisper White
Ink: Early Espresso
Other: circle and scallop circle punches

Nice and Easy but certainly gets to the real meaning of Chrismtas!

Hope to be back tomorrow--if these silly computers cooporate. 

Mary Jo

Tuesday, December 11, 2012

Try Stampin' on Tuesday!

Buenos días!  Or good morning!  My son has decided that he wants to learn Spanish--I thought that might be a fun thing to do on-line together.  We learned Good morning, hello, and I want to go to the bathroom last night!  Weird place to start but what the heck.  

Welcome to my second week as a member of the Try Stampin' on Tuesday Design Team (challenge posts on Tues. at 10am on the challenge home page) .  This week we have a fun sketch for you to try....


I am nearing the end of my Christmas card making and I am going to be so glad to move on.  But for now I am still sharing Christmas cards with you.  I decided not to use different papers or patterns on the sides--instead I used an embossing folder on each side.  Kind of like how it turned out.  Love this snowman image--actually I love any snowmen images, lol!  Kind of like butterflies in my book, you can't go wrong.


Stamps: Frosty Friends, Come to Bethlehem
Papers: Real Red, Lucky Limeade, Whisper White
Ink: Basic Black, Real Red
Other: markers, rhinestone, snowflake die, delicate designs embossing folder

I hope you find time to play along with us. 
FYI my Monday sketch challenge will begin again in the new year for those of you asking.
Enjoy your day!
Mary Jo


Friday, December 7, 2012

Snow Angels

Didn't you love making snow angels when you were a child!  What am I talking about I still love to make them--those and the flowers that you can make with you foot--did you ever do those? 
 
I seen this somewhere where someone make a snow angel with this darling little gingerbread and knew I had to take it and run with it.   This was actually one of the cards we made at my final Christmas card class this year.  Now that all my Christmas cards are done--I need to find all my addresses--I changed computers and I think they are still on the old broken one--it is ALWAYS something ya know.  Well anyway, back to the card for today.
 
I used the Scentsational stamp set and die set--one of my favorites from this year's Holiday catalog.
 

Stamps:  Snow Much Fun, Scentsational Seasoons
Paper: Midnight Muse, Baja Breeze, Whisper White
Ink: midnight Muse, Crumb Cake
Other: markers, rhinesones, scentsational seasons dies, pearls
Northern Flurry Textured Impressions Embossing Folder Die

TGIF!  Hope you are on your way toward a great weekend!
Mary Jo

Thursday, December 6, 2012

Gift Card holders--a HUGE need this time of year!

I don't know about you but there are many teens on my Christmas list and I never know what to give them.  So what generally happens is that I get them some small token gift and then give them a gift card.  But what fun is that????  Well, it is lots of fun if you give it in a double slider gift card holder!  Don't you think this is fun???


Here is what it looks like when you pull the top ribbon....


Of course I didn't have a gift card on hand so I used my Kohls pints card.  But you get the idea.  What to know how to make it?? It is really easy.

You will first need to start with a 9 by 5 1/2 inch piece of card stock
score at 1/2, 3 and 1/2, and 6 1/2.

Use a punch to notch out sections as shown in the photo above.  The half circle will be the part that will hold the pull ribbon.  And the other two rectangle notches will be used as a track for the slider to follow.

The part with the half circle will also be your front so you can decorate as desired.

Next you will cut two pieces of card stock  2 1/2 by 4.  One of these will be the top slider and will have your sentiment stamped on it--the other will hold your gift card.  You may go ahead and decorate these as you would like--you will need to keep them pretty simple though as any bulk will interfere with the slider.  I used my snail type adhesive and just ran a strip down the back of the gift card and attached.  And as far as the sentiment piece I kept mine very simple.  I stamped the sentiment and actually re-attached the notch I cut from the front so that when it is closed it looks like it is whole (kinda, lol)  You will need to punch a hole in this piece and add some ribbon. 

The next thing you will need is a piece of a plastic bag.  I cut a strip from a Stampin Up bag but it could be any plastic bag.  The strip should be just a bit thinner than the rectangle notches you cut in you base card stock. You will be taking the plastic bag strip and wrapping it around the section with the two rectangle notches. You will be forming a type of belt around that section.  See below. (mine is pretty crooked and ragged but it will work just fine)


I used small pieces of scotch tape to cover where the ends meet and keep the flow smooth.

Now comes the fun/tricky part.  It is not hard, you just have to pay attention to how you add the pieces to you slider so that they will function correctly. Lay you card stock so that the half circle opening is on the top left.  Add a piece of double stick tape or adhesive to the plastic about 1 inch from the bottom notch.  Now attach your sentiment panel to the tape with the top edge even with the top edge of the card stock base.  Remember you only want a small section at the bottom of the panel to be attached and it can only be attached to the plastic bag.  If any adhesive is on either the panel or the card stock base it will keep your slider from moving.  Next, with you sentiment layer in place and even with the top edge of the card stock base turn your base card stock over so that the the half circle notch is now on the top right hand side.  You will now attach you gift card slider panel to the plastic bag the same way as you did the sentiment panel, except this time the gift card will be facing down (it will be the part attached to the plastic) and you will be lining it up to be even with the bottom edge of the card stock base.  When you have this done you can just fold on your score lines and run adhesive on the small half inch section to hold it all together.  I hope this makes sense--let me know if you need more pictures. 

Have fun making your gift card holders.  By the way--gift card holders are the challenge on Latenightstamper's this week so if you are a member over there you may want to check out all the different sample.  If you are not a member--why not????
Mary Jo


Tuesday, December 4, 2012

Try Stampin' on Tuesday Challenge

Guess what!??!!  I am now a member of the Try Stampin' On Tuesday Design Team!  How exciting is that!  There are some extremely talented girls on the team so I know you will want to become aquanted with them right away! Check out the introduction post HERE  you can see the other team members on the sidebar of the Try Stampin' On Tuesday blog.


Here is my first official sketch... I really love it and will most likely do another card with it later today! 


Here is my first sample for the challenge...

I really wanted to use this darling hedgehog stamp so I needed to move the strip down a little to accomodate.  This set is long ago retired but I used at least one stamp from it every Christmas--so cute. We would love to have you play along with us!
Have a great day!
Mary Jo

Monday, December 3, 2012

No sketch challenge today--but I do have....

a fun card to share with you.  I am posting late because I was trying to decide what to do about my sketch challenges.  The participation has been really low lately and it is really discouraging--it takes me quite a bit of time to come up with all the sketches and I am thinking it is not really worth it.  So with that being said I think I will let the challenges go --at least for the rest of the year.  At one point I had a team of people who played along so it really didn't matter who else played along since we all played and visited each other and had fun sharing together.  If I am able to put together another team to play along I will begin again in January!  And if not--then I will just continue to share and do other peoples challenges--there are so many to play along with that I won't even miss my own, lol.  So we will see where it goes from here--sometimes change is good.

Starting tomorrow I will be one of the new design team members for the Try Stamping on Tuesday Blog!  I am really excited to be a part of this great team!  So be sure to stop back tomorrow to meet the other players and join in on the fun.  And of course I am still on the Latenightstamper's challenge team.

Here is a non-Christmas card share for you today--need to take a break from all those holiday cards every now and then to keep my sanity.  I have been wanting to do one of these star/sun burst cards for a long time but just never gave it a try--but there were lots of scraps laying around on my work table so I thought--now is the time!  So I used those Christmas paper scraps to make a thank you card!


Isn't that fun!  Don't even look like Christmas Papers does it.  Of course that paper pack is not a what you would call a traditional Christmas.  The pack is called the Festival of Prints and it is available in the Holiday mini.

Stamps: Engraved Greetings
Paper: Early Espresso, Bashful Blue, Very Vanilla and Festival of Prints paper pack
Ink: Cherry Cobbler
Other: pearls, spellbinders dies

When I made mine I kind of eyeballed it but I did make a quick (and I mean quick) template in MDS to share with my customers.  You can print it out and cut out all the individual starburst pieces.  The file should be 5.25 by 4.    Next choose your papers--I would use at least three different papers.  Next you would just use some teporary adhesive to hold each individual starburst piece over you paper of choice and use it to cut your parts. After all your individul pieces are cut you can  just re-arrange on your base sheet in order. Don't worry too much about the parts that are behind the circle--it will be covered.  Hope this makes sense -- if not feel free to ask any questions.


  See you in the morning with the Try Stamping on Tuesday Challenge!!!

Mary Jo