This is cute and not a bunch of questions to answer. Just tell them your name and they will give you a new elf name, try it!
| Your Elf Name Is... |


This is cute and not a bunch of questions to answer. Just tell them your name and they will give you a new elf name, try it!
| Your Elf Name Is... |
This weeks challenge was to use one stamp in different ways. Ya know, to show the versatility of the stamp. So of course I pulled out my Big on Christmas stamp set to make a Christmas card. This is the same stamp I have used twice before to create birthday cards. Those cards are also added to this post with links to the details. I hope you enjoy.
This is the first time I have used this set the way it was intended to be used. Here is the front and then next picture is open. 
The base of the card is Certainly Celery. I folded it in half and then cut off a 1 inch strip on the bottom front with a scallop blade. I added a 1 and 1/4 inch strip of designer paper from the Wintergreen collection on the inside bottom. The main image is stamped on Whisper White and layered on Real Red. I colored the letters in with marker and the re-stamped the tree and cut that out to pop it up. The tree is also colored with markers and I added a highlight to the word holiday with the marker too. I used a red gel pen to add dots around the focal image and around the scallop edge. Before attaching my focal image to the card I stamped a row of ornaments from the retired Ornamassortment Set. The branches are from the retired Holiday Hedgehogs set. I think it turned out kinda cute although I like the birthday cards better! See below. 
Details for this card can be found here.

This is one of my favorite techniques although I don't use it often. First I wheeled the Snow wheel across a piece of Whisper White card stock using VersaMark ink. I then embossed it with white embossing powder. Next I randomly stamped the snowflakes from Snow Burst in VersaMark over and around the already embossed area. I let the VersaMark set for a moment (do not emboss) and then brayered over the whole piece with Blue Bayou ink. The results are two different layers of resist. The embossed area will completely resist the ink and the VersaMark will only lightly accept the ink. It is very pretty in person. I love this look with leaves too! To finish my card I attached the finished layer to a strip of Soft Sky and the onto another piece of Whisper White that has the Whimsy jumbo wheel rolled on it in Soft Sky and the the smaller snowflake form Snow Burst stamped in Blue Bayou. This whole thing is attached to a base of Blue Bayou that has the front bottom scalloped with the small corner rounded, pierced with the paper piercier, and little dots with my gel pen. Finally I stamped the Happy Holidays from Riveting and punch out the center. Layered it on a piece of Whisper White and stamped the small snowflake inside. This whole piece was then punched out and layered on the designer label punch! Hope you enjoyed. This was the technique at our last technique class and everyone said they loved it. We also did a leaf card and 6 x 6 page for our books.

OK, so I could not find my cord to charge my camera so I did not post this on time. I did get it done on time though, if that counts for anything. This week's challenge was another inspiration challenge. I must admit mine is a bit more than an inspiration, it is more like a CASE. This card was so stunning and simple that I had to recreate it. I did not have the set she used, or the colors or the ribbon so it is not as nice as her's but I still love it. You can see the original here.
My card uses Ballet Blue, Night of Navy and Whisper White. Stamp sets used are Sincere Salutations, Snow Burst and Season of Joy.
Here are your random numbers:
80
Timestamp: 2007-11-24 14:20:19 UTC
Just in time to wrap up your holidays; tags, ribbon and stamps!
From November 23 through December 15, you can save on the following products:Let me know if you need me to order any of these products for you at this great price.

A friend of mine forwarded these to me and I thought they were cute so I thought I would share them with my bloggin friends too! Hope you have a GREAT day!


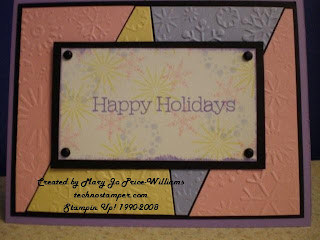
Here is a new twist on an old technique. This is such a fun technique no matter how you do it. But using your embossing folders gives you a whole new look! The step by stem tutorial is below! Please let me know if your try it, I would love to see your creations. I also posted a more traditional mosaic technique card at the end so please check it out!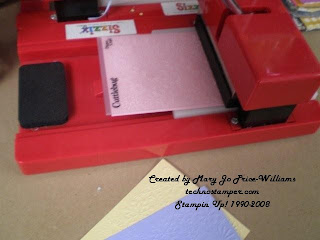
The first order of business is to choose two or more coordinating colors of card stock to use on the mosaic card. I chose the following three colors Pretty in Pink, Barely Banana and Lavender Lace for my card. Next your will need to emboss all three of your pieces of card stock with the same folder. I am using the snowflakes folder.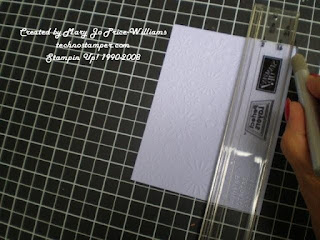
After you have three pieces of card stock embossed you will have to trim them all so that they are identical! This part is important so that they will look lined up in the later steps. So be sure to trim them all the same size and leave the exact same images. This is easier to do with a stamped image but not hard at all this way.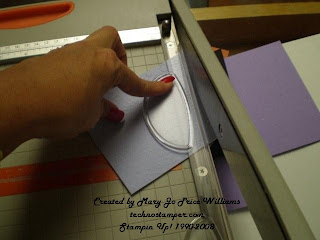
Next you will stack all three pieces of card stock together and cut into your shapes. (you are cutting all three pieces at once) I chose to make four angles shapes from mine. You can do as many as you like. Of course you will need to do at least the three to show all three of your colors. As you cut your stacked card stock be sure to lay it out next to the trimmer as the pieces are cut. This will help you to keep them in the correct order.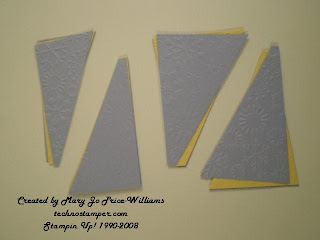
This picture shows how you should be setting your cut pieces next to your trimmer. Keep the piles together and keep them in the correct position.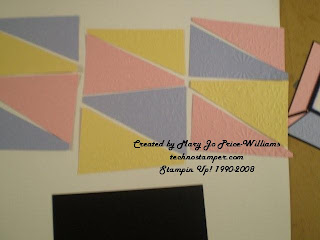
Next you will begin to lay your images out in alternating colors as shown above. You will get three background from this! Hence my 3 for 1 in the math equation.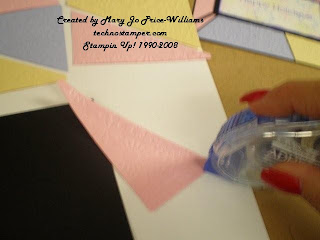
You can attach these directly to your card base but I like to choose another color of darker card stock to attach them to first. It really makes the background pop! I almost always use black but I am sure it would look good with other colors too --experiment and see what you like.
I just apply adhesive to each piece and attach it to the black background leaving a little space between each to help make it pop. You can see this in the photo below.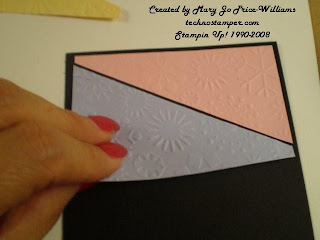
Now you can attach to your card base and embelish as desired. Here is my finished card again.
The next picture is of a card made using a more traditional form of the technique. Hence my 2x in the math equation. Hope you enjoyed and don't worry there will not be a test!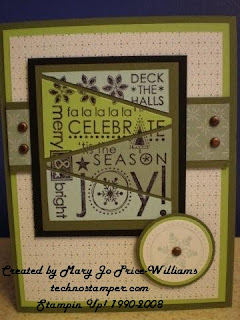
I did the exact same thing but with a stamped image and used it as my focal point. This works great with background stamps too. Thanks for stopping by today. Hope everyone in the states has a great Thanksgiving And to the rest of you just enjoy your day!
There are only a few days left on my Techno Take-Out!
Make sure you sign up for it. I am giving away a $20 gift certificate for Stampin Up!. Click here to enter.

 I have not done one of Beate's challenges in a while, hopefully I can get back on the weekly schedule with this because they are fun to do. I made this with a brand new set that will be a hostess level three in the next catalog! Stampin Up! sent us this for FREE. That's right, FREE. Just one more reason to be a demonstrator for Stampin Up! Anyway, back to the card. I had fun with the layout. The base of the card is Pretty in Pink followed by Purely Pomegranate. These two colors are beautiful together. I added a small amount of Barely Banana too. (might do So Saffron next time I put these colors together) Other supplies used Designer paper, paper piercer, brads, markers, white gel pen and large scallop circle punch.
Make sure you sign up for the Techno Take-Out. I am giving away a $20 gift certificate for Stampin Up!. Click here to enter.

Whew! I almost forgot about this challenge. Someone posted early last night and that reminded me so I rushed home to do it and believe it or not I am quite happy with the results! Hope you like it too. The challenge was to use Chocolate Chip, Pumpkin Pie, Brocade Blue and Old Olive on your card. I was not sure what I was going to do with the Brocade Blue -- it seemed like a mis-fit. But it actually works. Stamp Sets used: Autumn Harvest and Wishes Awash (retired). Other items other than the colors mentioned. Square Punch, Circle Punch, Ticket Corner Punch, Markers, Blender Pen, Brocade Blue Brads and Creepy Crawly Designer Series Paper.

This is for the Ways to Use It Challenge on SCS. The challenge is to use unique brads on a card. The brads don't match perfectly but they do not look this off in real life. I could not get a good picture but you get the point. I used a bunch of stamp sets on this for such a simple card! I used the Retired set Love it for the main image and the stencil that goes with it. The stars on the strip are from Wanted. Missing you is from So Many Sayings. Please Return is from Office Accoutrement and With Honor is from the retired God's Children stamp set. The base of the card is Sahara Sand and the other color is Always Artichoke.
My son has a wonderful group of women working with him this year at school and I want to make them little gifts for Christmas. This is the first one, I am so excited to have one done this early -- now to find a way to NOT give it to her early. That is why I never shop too early, I can never keep myself from giving early and then still needing something for Christmas!


This is one of my cards for my All Occasions Class tomorrow. I figure it is pretty gender friendly. The base of the card is Really Rust. The bottom is designer series paper from the Outlaw collection and on top is a piece of Sage Shadow that has the retired jumbo Dry Brush wheeled across in Really Rust. I punched the corners on top with the ticker corner punch and then dry embossed faux brads with the Crop-A-Dile. Next is a strip of Chocolate Chip covering the seam of the two papers. I stamped the star from Wanted in Vanilla on it. The big medallion is also from the Wanted set. I stamped it in Chocolate Chip on Vanilla and punch it out with the scallop punch from Stampin Up. I added it to a circle of Really Rust and then a larger scallop of Chocolate Chip. There is a brass brad in the center and the whole thing is popped up on dimensionsals. The saying is from So Many Sayings and is stamped in Chocolate Chip on Sage Shadow card stock and then punched out with the word window punch. I added it on top of a piece of Really Rust that was stamped with one of the stamps that came in the Designer Label punch box. I think that is it? I hope so anyway, if you have any questions feel free to post them here. Thanks for stopping by and be on the look out for another Techno Takeout (blog candy) coming soon. I am way overdue!
 A friend of mine needed a card for someone who is having triplets -- YIKES can you imagine! So much joy and so much work all in one. So this was what I came up with. I had a few other ideas in my head but this just seemed to work. The card is designed around the colors in the Cutie Pie paper pack. This paper is so fun to work with the colors are great. The base of the card is So Saffron. I attached a 1 and 1/4 in strip of the dots to the top of the card and the stripes on the bottom. Next I stamped the baby from the retired set Occasionally in So Saffron, Certainly Celery and Rose Red. I added little dots around the out side edge of the stamp in alternating colors. Next I punched them out and attached them to a strip of Basic Black. I used my paper piercer to make a row of holes across the bottom of the black paper then added ribbon right above the piercing. Just for a bit more I added a strip of polka doted scallop sticker from the Friends and Family Simply Scrappin Kit right below the ribbon. I attached this to a layer of Bashful Blue and added two Bashful Blue brads in between the babies. I mounted this to the card with dimensionals. The saying is also mounted on dimensionals. I hope she likes it.

Today's challenge was to use magazines or pictures in a creation. At first I was totally confused and then was reminded that we could use our pictures as in this post but I figured since I already did that I would focus on the magazine portion of this challenge. I quickly thought of the beautiful pictures that are in the Southern Living at home catalog and thought "hmmm I wonder if any are the right size". Bingo! This is such a pretty picture and it was the perfect size. I matched it up to the Winter Bright Scrapin Kit and went from there. The base of the card is the textured Pretty in Pink that is in the kit. I used my paper piercer to make small holes in both upper corners. Next is a layer of bashful blue which has the little flowers from So Many Sayings stamped in Real Red on the top and the old retired saying stamped on the lower right corner. I found a small scrap of the striped paper from the kit and used the corner rounder to scallop the edge and then layered it on a strip of Real Red. Next I added some Real Red faux stitching across the top and some small white dots around the bottom with my gel pen. The image is punched out and layered on a larger Real Red scallop circle. The scallops each have white dot which was done with my gel pen. This image is popped up on dimensionals. Last are the three little brad type embellishments by the saying. Hope you enjoy.
 I just love how this card came out. It is hard to believe that I have had this saying from the retired Totally Cool set for a couple of years and it never crossed my mind to use it with a snowman image before. DUH! This was for a friend of mine who loves snowmen. The snowman is also from a retired set -- Snow Much Fun. The background on the bashful blue is the new Snow Burst set from the Holiday Mini. It is stamped in two generations of Bashful Blue, white and vanilla inks. The designer series paper on the side and on the snowman's hat is from the Cutie Pie pack. Both the small strip and the large scallop are Rose Red. I highlighted the word cool with Certainly Celery and the snowman with Going Grey. Finally I used my paper piercer to make holes around the large scallop.

 This is for today sketch challenge on SCS. I will keep it quick since I have to get my son to bed. Supplies used: Pale Plum, Perfect Plum, Mellow Moss and Vanilla card stock. Pale Plum and Perfect Plum ink. Markers, paper piercer, mat pack, eggplant grosgrain ribbon and Cuttlebug embossing template. Carte Postale and Baroque Motifs stamp sets.

I love this Sidekick Sayings set! It is so easy to work with. The base of this card is Really Rust. Followed by a layer of Pumpkin Pie. I wheeled the Whimsy jumbo wheel across the bottom portion with Really Rust ink. While the wheel was out I rolled it across a piece of Vanilla for the center strip. I randomly added the leaf from the Moose You set inked in the Pumpkin Patch spectrum pad. Next I added some Really Rust ink to the edges to tone down the starkness of the Vanilla. This was mounted on a strip of Really Rust and added to the Pumpkin Pie layer. The focal image is stamped in Chocolate Chip on Vanilla and colored with markers. I highlighted the words -- Happiness, Love and Hope with the Pumpkin Pie marker. I then added some Old Olive ink to the edges and mounted it on Old Olive card stock. After attaching this to the card I finished the whole thing off with some paper piercing along the top edge of the middle strip.
I am not really sure why, but I felt moved to post this today. My belief is that one of my subscribers really needs to hear this and maybe it is you. We all get in bad places some times in our lives and we just need to hold on and Stand Our Ground. If you are not interested just ignore this post and have a great day!

One more for today's color challenge. I had to do a Christmas card with these colors. I have been wanting to use this deer as Rudolf since I seen it. The colors are Wild Wasabi, Sky Blue and Ruby Red. How fun. I used chocolate chip ribbon to bring in the brown from the deer. The saying is stamped in Chocolate Chip with one word re-stamped and cut out on YoYo Yellow. Supplies used: Star Studded Season, Moose You and retired holly wheel. Scallop square punch, scallop circle punch, circle punch, markers, hodgepodge hardware and chocolate chip ribbon.
 This is for the color challenge on Splitcoaststampers today. It is color challenge number 139. The colors are Soft Sky, Wild Wasabi and Ruby Red. Great colors together. It immediately made me think of Christmas but I needed a You did it type card so I chose to go this route instead. I really like the colors together, not sure about the card layout but it will certainly do. It is for my seven year old son who has been having a bit of a hard time in school. He is working so hard it just doesn't always come easy to him. I hope this lets him know how proud I am of him. Supplies used besides the colors mentioned. Basic Black and Whisper White card stock. All Year Cheer II, Wanted, Teacher Time and Headline Alphabet stamp sets. Circle punches and a black gel pen.

I am not sure why but I love this card. It was really simple, actually only took about 5 minutes total! Maybe that is what I love about it. We made this at our club last night too. The base of the card is Chocolate Chip. The focal image is the horse from the Wanted stamp set along with the swirl from the Bronc Buster set. The swirl was stamped off once and both are done in Chocolate Chip ink. The layer underneath is Sage Shadow. The faux stitching is done with the really rust marker. The bottom layer is a piece of designer series paper from the Outlaw pack layered on Really Rust card stock. Again I faux stitched with the really rust marker, paper piercer and mat pack. The saying is from It's Your Birthday. There are also brads and ribbon added for a little extra.

If you own this toy or are planning on buying please read this article. This toy has been recalled and I can not believe why! I thought it looked cool and thought about getting it for a few of the girls on my list, YIKES.
You can read about it at http://au.news. yahoo.com/ 071106/2/ 14uw3.html
Honestly I am afraid to buy anything for the kids lately! We really need to get back to American Made products somehow! This is scary.
I finally broke down and tried one of these file folder cards. Once you get the cutting down its easy but man what I time I had getting it down, lol!
The base of the card is Chocolate Chip. I attached a piece of Blizzard wrapping paper to the front of the file folder. The belly wrap is Chocolate Chip with a scallop circle to cover the seam. I stamped the word Original from the Office Accoutrement stamp set in Chocolate Chip on Whisper White and punched it out with the circle punch. I added three white metal buttons type embellishments to add interest to the brown strip. The next picture shows the file insert.
I used Bashful Blue for the base of the insert. The next layer is Whisper White. I stamped the verse in Chocolate Chip and then the Happy Birthday in Bashful Blue. Both of those stamps are from the It's Your Birthday stamp set. The dots around the edge are free hand. And the tab is from Totally Tabs and is stamped on Whisper White with Chocolate Chip and punch out with the Round Tab punch.
One of my favorite things about paper crafting is to re-create or bring new life to an item that is not quite what you want. That is what I have done with the frame that I found at JoAnn's for a quarter! The first picture will show you the two frames next to each other and then the next just shows the finished frame.
As you can see there was a little point of a crayon that needed to be cut off. I used an exacto knife and then sanded with the Stampin Up! sanding block. Before going any farther I painted the edges of the frame dark brown with acrylic paint. I decided to use the Simply Scrapin kit from SAB since I still have lots of pieces let over from other projects. I love this paper. I took the back and the insert parts off the frame and laid it on the back of the paper so I could trace the frame both inside and out. I then cut on the lines and attached the paper to the from with Scotch Quick Drying glue. I sanded the edges with the sanding block to get a nice finished look. Then I stamped the word friends in Basic Brown on Whisper White and colored it in with markers. I used so saffron, regal rose, bashful blue and certainly celery. The scallops on the ends of the Whisper White piece were done with the retired corner rounder. The Whisper White is mounted to a layer of Bashful Blue that has the pink scallop stickers from the kit on the top and bottom edges. I added two regal rose brads and mounted the whole focal piece on the frame using foam mounting tape. Finally I added the flowers and word always from the stickers to finish it off. If you have never worked with one of our simply scrappin kits you really need to give them a try. The stickers are card stock stickers and the papers are awesome! Heavy weight and everything coordinates so well! Love them for more than just scrapbooking.

The original challenge was to use embellishments on your card. Since I do that all the time I figured I would step up the challenge a bit for me and say -- use an embellishment that you NEVER use on a SIMPLE card. I love these little photo turns but my hodgepodge hardware kits are still full of them. This is truly a simple card. I still need thank you so this one works for me. The base of the card is Apricot Appeal. The main image from the simply said stamp set is stamped in Not Quite Navy on Whisper White. I used the distressing tool from the cutter kit to distress the edges. I then attached it to a layer of Not Quite Navy card stock that I have the saying stamped in black on the bottom. The top has a row of piercing done with my paper piercer. The background layer is certainly celery with the little flower stamped randomly in certainly celery and then mounted on a layer of Not Quite Navy. Of course I then added the photo turn to "hold" the main image in place. For a simple card I am very happy with it. I really wanted to add one more background layer but convinced my self that enough really was enough! Hope you enjoy.


I have been trying to post for days! I changed computers and I am having a "few issues" with the new Vista! This was the stuff that my son took to school on Halloween. The jars were for a few of his teachers and the gum treat holders were for his classmates. I also mad a little bucket of candy for his main teacher but I guess I did not get a picture of that. So be it, Halloween is over anyway, I just figured I would share since I wanted to on Halloween and couldn't . All of the samples use the Batty for You stamp set and the Creepy Crawly designer series paper. Other items used were: Scallop punch, circle punch, word window punch for slot to hold gum, black and orange grosgrain ribbon, black gingham ribbon, markers, dimensionals and Velcro to hold treat holders closed. If you have more questions please feel free to reply to this post and I will answer you right away. I have other posts to get up tonight so I am keeping this one short.
Creativity is God's gift to you. What you do with it is your gift to God.
-Bob Moawad
God whispers in your soul and speaks to your mind. Sometimes when you don't have time to listen, He has to throw a brick at you. It's your choice: Listen to the whisper, or wait for the brick. -unknown
Preach the Gospel at all times and when necessary use words. -St Francis of Assisi
God's "no" is not a rejection.
It's a redirection.
| Ask yourself: Have you been kind today? Make kindness your daily modus operandi and change your world. - Annie Lennox |

I would bet that you have most tools! But one thing on my wish list is this great holder for all your hanging embellishments called Clip-It-Up!
http://www.clipitup.com/
Joan
November 21, 2007 11:54 AM