Monday, December 31, 2007

Split baby

Today's technique lover's challenge on Splitcoaststampers was to do the Split Negative technique but in color instead of Black and White. I really like how cute this one is.

Stamps: Nursery Necessities and Nursery Letters Jumbo Wheel
Paper: Certainly Celery, Cutie Pie, Whisper White and Basic Black
Ink: Bashful Blue, Certainly Celery, VersaMark
Accessories: clear embossing powder, brads, ribbon, square scallop punch, black gel pen. markers

Not what I was thinking but what the heck....

I had great plans for this but somehow it did not work out as planned. The frame was at Target in the dollar bins so I figured what the heck. But when I got my new order of papers I went in a whole different direction than the original plan -- hate when I do that cuz I am never happy with the results -- oh well.


The other problem was that I could not get at the center from the back so trimming around the center part was not fun--hence the black around the opening.


I was able to use some rub ons from the new catalog and some new papers though. The words in the center are from a non SU stamp but I added the flowers that are from the Garden Silhouettes to bring it together. Not sure I like it but it may grow on me, if not I will have to send it to someone for a RAK -- hmmmm, wonder if that is still an act of kindness????

Sunday, December 30, 2007

Celebrating You!

Here is one more for today's challenge. I will have a busy day tomorrow so you get two for one today. I may have time to post tomorrow too but just in case. This is such a cheerful card, I love it. The layout is super. Here is the card that I CASED. What a fun challenge.

Stamps: Fast and Fun Notes
Paper: Certainly Celery, So Saffron, Bashful Blue, Rose Red and Cutie Pie dp
Ink: Basic Black and Rose Red
Accessories: markers, brads, ribbon, glitter, paper piercer, mat pack, photo corner punch, prima flower

Loads of Love

I so seldom use this set. I just never like the way it looks after I color it. I am not good at the whole shading thing. So I chose to paper piece this with these cool circles. This layout is actually for the FS47 challenge on Splitcoaststampers. I have only done these challenge once before but they are fun. The hostess picks a gallery and you get to go in a CASE a card from it! How easy is that. Of course you need to change a few things to make it your own. Here is the card that I chose to CASE. As you can see there are quite a few changes but the basic idea is still there. Hope you enjoy and thanks for stopping by today.


Stamps: Loads of Love and accessories
Paper: Real Red, Basic Black, Whisper White and Uptown dp
Ink: Basic Black
Accessories: cuttlebug, scallop punch, brads, markers, watercolor crayons

Friday, December 28, 2007

One more for the LSC148.

As soon as I posted the last card for this challenge my delivery came from Stampin Up and it included my new papers. Aren't they beautiful! So I figured I would do one more of these challenges to show off the new papers. This is a 6 x 6 card. The image is from Fun and Fast Notes. The paper is from the new catalog it's the Ginger Blossom Collection. The coloring is just markers and the ribbon is the chocolate wide satin. I need to change it out though since the cut looks rough. Didn't notice till I loaded the picture.

We miss you.

This card is for a dear friend of mine who is deployed right now. It is created using the Limited Supply Challenge on Splitcoaststampers. The image is colored in using re-inkers and the water brush. I just bought this image a few days ago so I was glad to use it. Here are the details of the challenge.

Follow the list #6

Stamps
one stamped image that can be colored
optional: sentiment
optional: an image to ground the main image like an oval, grass, etc.

Paper
any shade of white
2-3 patterns of designer paper
NO other colored cardstock

Tools
NO specialty tools (No punches, No CB, No Piercer, etc)
any coloring tools
sponges OK

Embellishments
one piece of ribbon

Dimensionals are an adhesive!

Keyword: LSC148


Blogger's Challenge 27


Another Friday and another Blogger's Challenge. This week we were to use something for inspiration. As I walked around my home this week I found this shell that someone special had brought back from Florida for me. It always makes me feel calm and serene when I look at it. I love the color purple and the water so that may be why. I thought that those feelings would be perfect for a sympathy card. I actually used the splitcoaststampers sketch challenge again that I used on my last post and some paper that I was challenging myself to use since it was a customer mistake. I don't really like the pattern on this designer paper but I think it is ok with this card. The base of the card is Lovely Lilac and the inks used were Almost Amethyst and Lovely Lilac. The card was almost too simple but I can not see what I could add that would not change the feel. Hope you enjoy.

Wednesday, December 26, 2007

A Good Thing Sketch Challenge


For today's Sketch Challenge on Splitcoaststampers. Here is the sketch..


I actually chose this layout because I had some extra paper from this card laying on my table and wanted to use it up but did not want to make any more Christmas cards! The base of the card is Certainly Celery. I cut the bottom edge off with my scallop blade on my Carl cutter. The strip that is added to the inside is from the Wintergreen collection of designer series paper. Since I knew I wanted to use the Time Well Spent set (which will be in the new catalog as a level 3 hostess set) I chose to use Pretty in Pink and So Saffron as the other colors. The flowers are stamped in basic black and colored in using markers. The circles are cut using my Coluzzle. The rest is pretty basic. Hope you enjoy.

Tuesday, December 25, 2007

MERRY CHRISTMAS TO ALL OF YOU! (who celebrate)

This is beautiful! Merry CHRISTmas!! {The First Christmas Gift}
I hope you are all able to view it.

For those of you that do not celebrate -- I wish you a joyous day too.

Monday, December 24, 2007

Your Worth a Mint!


These were the little treat baskets I gave to all of the Administrative Staff at my son's school. The little baskets were made from a pattern on Cambria's blog. They are actually peppermint patties disguised like little snowflake sandwiches. I made strips for the top of them that said You Are Worth a "MINT". I am sad that my son will be switching schools next year due to a re-districting everyone in this school has been so nice and so helpful.

Saturday, December 22, 2007

Double Duty - Triple Shaker


This card was a true labor of love. Did you ever have an idea in your head and it just don't work out quite as simply as you think it will? Well this is that card! I knew I was way behind on Blogging and challenges so thought I would combine this weeks Blogger Challenge (a card with movement) with this weeks Sketch Challenge at SCS. I was able to make it work but it took a bit more time than I was wanting to set aside for this. Oh well it is done now. The base of the card is the textured River Rock card stock. The images and words are from the Just Like You set. The flowers are stamped on Very Vanilla in Ruby Red and Groovy Guava. The Guava Circles are created by punching the 1 and 1/4 inch circle punch into a piece of Groovy Guava and then centering the circle in the 1 and 1/2 inch circle punch and punching again. These were layered over the Ruby Red 1 and 1/2 inch circles and then over the River Rock embossed piece. I then came back in with my 1 and 1/4 inch punch and punched out the center again to remove the Ruby Red and River Rock paper from the circles. Clear as mud? The rest is just your basic shaker card. Hope you enjoy.

Thursday, December 20, 2007

Jar of Cards for Teachers!

Well I sure did not get done as much as I wanted to this year for Christmas but I am out of time for teacher gifts. Here is the main gift for my son's three main teachers. I found a three pack of these plastic jars at JoAnn's. Of course they only had one package so this is all I got -- but you know I will be on the look out for more! I feel a class coming on.

I tried to keep them simple so that when they are empty they can use them other other things - like maybe a candy holder for their desks or what every they desire. I filled them with little mini 3 x 3 cards all with the Thank You theme. The individual pictures are also in this post. Not sure I will type up all the details but if you have a questions feel free to ask. This was my first experience with 3 x 3's and I really love them. I will be doing more for sure!


I really like how this one turned out. I still love this set even though it is retired. Nice and Easy Notes.


The ones that I gave to the teachers did not look as bad as this next photo. The punch was not working well on this one. I assure you the ones the teachers got look better!


Back to Reality

I have gotten a bunch of e-mails asking if I fell off the face of the earth -- well although it does feel like I did and landed on my head - Let me reassure you and ME that I am still here and alive. I am so sorry for this long break but I just can not seem to get rid of this virus. I start to feel better and then WHAM there is something else. The good news is that life goes on without us and that means that my son still has his Christmas Party at school today -- which also means I had to go down to my studio and do some stamping yesterday to get the gifts done so I will post them later and try to get back to our regularly scheduled program of consistent posts. Hope every one is ready for the BIG DAY! (I know I am not even close, lol) See ya later with some actual projects to share. Thanks for the concern, it makes me feel good to know that people noticed I was not posting.

Sunday, December 16, 2007

A new tradition in the making-I can't wait!

Again I have been sick. I have barely gotten out of bed except to do a few things that could not or would not happen without me being present -- even from a distance since I was contagious--I have strep throat with flu like symptoms, YUCK. I have a some time to surf and came across this and wanted to share because I thought it was beautiful. I so want to start this as a new tradition for my family. This is from the Weekly HugClub news.

A Christmas Story

It's just a small, white envelope stuck among the branches of our Christmas tree. No name, no identification, no inscription. It has peeked through the branches of our tree for the past 10 years or so.

It all began because my husband Mike hated Christmas---oh, not the true meaning of Christmas, but the commercial aspects of it... overspending...the frantic running around at the last minute to get a tie for Uncle Harry and the dusting powder for Grandma---the gifts given in desperation because you couldn't think of anything else. Knowing he felt this way, I decided one year to bypass the usual shirts, sweaters, ties and so forth. I reached for something special just for Mike

The inspiration came in an unusual way. Our son Kevin, who was 12 that year, was wrestling at the junior level at the school he attended; and shortly before Christmas, there was a non-league match against a team sponsored by an inner-city church, mostly black. These youngsters, dressed in sneakers so ragged that shoestrings seemed to be the only thing holding them together, presented a sharp contrast to our boys in their spiffy blue and gold uniforms and sparkling new wrestling shoes. As the match began, I was alarmed to see that the other team was wrestling without headgear, a kind of light helmet designed to protect a wrestler's ears. It was a luxury the ragtag team obviously could not afford. Well, we ended up walloping them. We took every weight class. And as each of their boys got up from the mat, he swaggered around in his tatters with false bravado, a kind of street pride that couldn't acknowledge defeat. Mike, seated beside me, shook his head sadly, "I wish just one of them could have won," he said. "They have a lot of potential, but losing like this could take the heart right out of them."

Mike loved kids-all kids-and he knew them, having coached little league football, baseball and lacrosse. That's when the idea for his present came. That afternoon, I went to a local sporting goods store and bought an assortment of wrestling headgear and shoes and sent them anonymously to the inner-city church. On Christmas Eve, I placed the envelope on the tree, the note inside telling Mike what I had done and that this was his gift from me. His smile was the brightest thing about Christmas that year and in succeeding years. For each Christmas, I followed the tradition---one year sending a group of mentally handicapped youngsters to a hockey game, another year a check to a pair of elderly brothers whose home had burned to the ground the week before Christmas, and on and on. The envelope became the highlight of our Christmas. It was always the last thing opened on Christmas morning and our children, ignoring their new toys, would stand with wide-eyed anticipation as their dad lifted the envelope from the tree to reveal its contents. As the children grew, the toys gave way to more practical presents, but the envelope never lost its allure. The story doesn't end there.

You see, we lost Mike last year. When Christmas rolled around, I was still so wrapped in grief that I barely got the tree up. But Christmas Eve found me placing an envelope on the tree, and in the morning, it was joined by three more. Each of our children, unbeknownst to the others, had placed an envelope on the tree for their dad. The tradition has grown and someday will expand even further with our grandchildren standing around the tree with wide-eyed anticipation watching as their fathers take down the envelope. Mike's spirit, like the Christmas spirit, will always be with us.

May we all remember Christ, and "give" in a Christ-like manner. After all, he is the reason for the season, and the true "Christmas spirit" this year and always.

Submitted by: Linda Kissick

Sunday, December 9, 2007

More Teacher Gifts


Here are a few more of my teacher gifts for this year. These are very fast and easy to make. I used my Colluzle to cut the large circles and the 5 in 1 envelope template for the gift cards. The jiffy pop handle is bent to go over the top of a two liter bottle of pop. The rest is pretty self explanatory. Let me know if you have any questions.

Saturday, December 8, 2007

The count down is here...


Time is running out on creating your hand made Christmas cards for the year. If you have not even started yet this is a SUPER fast and easy card for you to try. This was created with the hostess set Sidekick Sayings. What a fun set this is I will be sorry to see it retire. This was the fasted card ever! Stamp the image and color with markers. Highlight words-layer on Old Olive paper. The designer paper is from the Dashing collection, the holly is from the Holiday Tag Team set and the dots along the top of the striped layer are done with a marker. (other colors used-River Rock and Real Red) Can't get much easier than that. Hope this encourages you to start those cards because with layouts like this it is NOT too late to start now!

Friday, December 7, 2007

Blogger's/SCS challenge


Man have I been busy again! I have not had a moment to work on any challenges over at SCS so I decided to combine the sketch challenge for the week with the Blogger's Challenge. Here is the sketch for the SCS challenge.


And the Blogger's challenge was to use water coloring. I soooooo love this set Holy Triptych from the recently retired Holiday Mini and will be sad when Christmas card making is over. I will need to find other ways to use it. I could use the angel and the tag part but will see what I come up with later. Now on to this particular card. The base of the card is Purely Pomegranate followed by So Saffron. Next I went back to the Pomegranate and then to the Always Artichoke designer paper. Such an easy layout and does not really require or even leave room for too many extras. The focal image is embossed in black and then colored with my water color crayons and aqua painter. I finished it off with the beautiful Pomegranate satin ribbon. Hope you enjoy!

Wednesday, December 5, 2007

All Spruced up for the Holidays!


This was one of the cards for my third round of Christmas Stamp and Stack today. The focal image is from Fun and Fast notes. I stamped it in Old Olive ink and then colored it with chalks. Next I covered the colored areas with VersaMark using my Versa Marker and embossed it with clear embossing powder. You can not tell from the picture.

The base of the card is Real Red followed by a layer of River Rock that has the words stamped across the top with little asterisks free handed in Real Red marker in between each phrase. Next are two strips of designer paper from the Dashing series. The red scalloped strip is over the seam and is paper pierced on both sides of the words. (again this is not really visible from the picture) The words are stamped on River Rock and punched out with the word window punch. I added some dots around the focal image with the red marker before attaching it to the large scallop circle. Finally I pierced all of the scallops on the large scallop circle. Thanks for stopin by today! Have a great one.

Monday, December 3, 2007

Skating through the Holidays.


I would love to say that this little guy skating in front of the trees from Lovely as a Tree was my idea but I have seen it many places before and just finally got around to making it when I was reminded by a new version by Kyla Maestas. I decided to create a card that had a half front with the Scallop Circle overlapping the inside portion of the card. This next picture shows the card open.


I absolutely adore the Wintergreen papers, I am not gonna be happy when they retire. The little hedgehog is long ago retired. I think he is the cutest little guy. I hope you enjoy my card today.

Supplies used: Holiday Hedgehogs (retired), Lovely as a Tree, Festive Favorites and Warm Words stamp sets. Wintergreen designer series paper, Whisper White, Sage Shadow and Always Artichoke card stock. Basic Brown, Chocolate Chip and Always Artichoke ink. markers, water color pencils, blender pen, large scallop punch, large circle punch, large and small oval punches and a white gel pen.

Saturday, December 1, 2007

Stampin Up! retired list is here!

This is the list that will be retiring from the Winter Fall Catalog. You only have till the end of the month to order these sets and then they will be gone forever! There are only two I really NEED and don't have--how about you? Check out the list by alphabetical order here or by page number here.

The retired accessories list will be out on the 10th. Please be sure to order early enough to get in before the deadline. I will need to receive your payment before placing the order so please keep that in mind. Happy Saturday to everyone!

Friday, November 30, 2007

I alwasy wanted to be an Elf.

This is cute and not a bunch of questions to answer. Just tell them your name and they will give you a new elf name, try it!

Your Elf Name Is...

Freckles Mc Mini

Thursday, November 29, 2007

Blogger's Challenge

This weeks challenge was to use one stamp in different ways. Ya know, to show the versatility of the stamp. So of course I pulled out my Big on Christmas stamp set to make a Christmas card. This is the same stamp I have used twice before to create birthday cards. Those cards are also added to this post with links to the details. I hope you enjoy.


This is the first time I have used this set the way it was intended to be used. Here is the front and then next picture is open.


The base of the card is Certainly Celery. I folded it in half and then cut off a 1 inch strip on the bottom front with a scallop blade. I added a 1 and 1/4 inch strip of designer paper from the Wintergreen collection on the inside bottom. The main image is stamped on Whisper White and layered on Real Red. I colored the letters in with marker and the re-stamped the tree and cut that out to pop it up. The tree is also colored with markers and I added a highlight to the word holiday with the marker too. I used a red gel pen to add dots around the focal image and around the scallop edge. Before attaching my focal image to the card I stamped a row of ornaments from the retired Ornamassortment Set. The branches are from the retired Holiday Hedgehogs set. I think it turned out kinda cute although I like the birthday cards better! See below.


Details for this card can be found here.


Details for this card can be found here. Thanks for checking in today. Hope you have a WONDERFUL day!

Wednesday, November 28, 2007

Double Resist Snow Flurry


This is one of my favorite techniques although I don't use it often. First I wheeled the Snow wheel across a piece of Whisper White card stock using VersaMark ink. I then embossed it with white embossing powder. Next I randomly stamped the snowflakes from Snow Burst in VersaMark over and around the already embossed area. I let the VersaMark set for a moment (do not emboss) and then brayered over the whole piece with Blue Bayou ink. The results are two different layers of resist. The embossed area will completely resist the ink and the VersaMark will only lightly accept the ink. It is very pretty in person. I love this look with leaves too! To finish my card I attached the finished layer to a strip of Soft Sky and the onto another piece of Whisper White that has the Whimsy jumbo wheel rolled on it in Soft Sky and the the smaller snowflake form Snow Burst stamped in Blue Bayou. This whole thing is attached to a base of Blue Bayou that has the front bottom scalloped with the small corner rounded, pierced with the paper piercier, and little dots with my gel pen. Finally I stamped the Happy Holidays from Riveting and punch out the center. Layered it on a piece of Whisper White and stamped the small snowflake inside. This whole piece was then punched out and layered on the designer label punch! Hope you enjoyed. This was the technique at our last technique class and everyone said they loved it. We also did a leaf card and 6 x 6 page for our books.

Monday, November 26, 2007

VERY late Blogger's Challenge


OK, so I could not find my cord to charge my camera so I did not post this on time. I did get it done on time though, if that counts for anything. This week's challenge was another inspiration challenge. I must admit mine is a bit more than an inspiration, it is more like a CASE. This card was so stunning and simple that I had to recreate it. I did not have the set she used, or the colors or the ribbon so it is not as nice as her's but I still love it. You can see the original here.

My card uses Ballet Blue, Night of Navy and Whisper White. Stamp sets used are Sincere Salutations, Snow Burst and Season of Joy.

Saturday, November 24, 2007

The winner is.......................................................

Thanks so much for the ideas. I have chosen to get the Scorpal or Score It and the Bind it All! I of course will also be adding stuff from the preview mini too. Hope everyone has a great holiday season. Here is the winner..........................................


Random Integer Generator

Here are your random numbers:

80 

Timestamp: 2007-11-24 14:20:19 UTC


I counted twice and the winner is....
StampingJoan said...

I would bet that you have most tools! But one thing on my wish list is this great holder for all your hanging embellishments called Clip-It-Up!

http://www.clipitup.com/

Joan

November 21, 2007 11:54 AM


Joan, e-mail me with your order and your address. You just won $20 to use as you please. Congratulations.

Friday, November 23, 2007

Techno Take-Out--give away for you!


Wow, I can hardly believe in the last five weeks since my last Techno Take-Out that this little blog has gone from 5.000 hits to over 31,000. That just boggles my mind. And since the holidays are near and I need to make my wish list I thought you could all help me out. I am gonna give a $20 gift card for Stampin Up merchandise to one lucky winner. The winner will be randomly chosen on the 23rd of November at midnight and you will get to order your choice of merchandise up to $20 from the catalog! All you have to do to be entered is to leave a comment on this post and let me know what item /items you think I NEED to have on my Christmas list. What are the best investments you have made lately? Links to online sites would be great too if you have them. So essentially I am looking to be enabled --- Shhhhh don't tell hubby, lol. Thanks to all of you for your support and encouragement -- it keeps me stampin!

Wrap up the Holidays Stampin Up! sale


Just in time to wrap up your holidays; tags, ribbon and stamps!

From November 23 through December 15, you can save on the following products:
Let me know if you need me to order any of these products for you at this great price.


Thursday, November 22, 2007

Happy Thanksgiving!

A friend of mine forwarded these to me and I thought they were cute so I thought I would share them with my bloggin friends too! Hope you have a GREAT day!


Wednesday, November 21, 2007

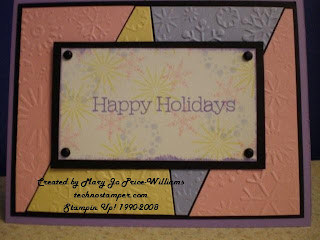
3 for 1 2x Math 101 tutorial -- Cuttlebug Mosaic


Here is a new twist on an old technique. This is such a fun technique no matter how you do it. But using your embossing folders gives you a whole new look! The step by stem tutorial is below! Please let me know if your try it, I would love to see your creations. I also posted a more traditional mosaic technique card at the end so please check it out!


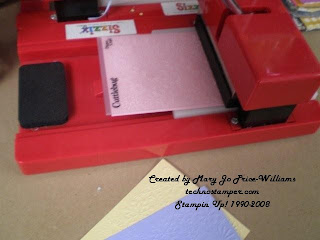
The first order of business is to choose two or more coordinating colors of card stock to use on the mosaic card. I chose the following three colors Pretty in Pink, Barely Banana and Lavender Lace for my card. Next your will need to emboss all three of your pieces of card stock with the same folder. I am using the snowflakes folder.


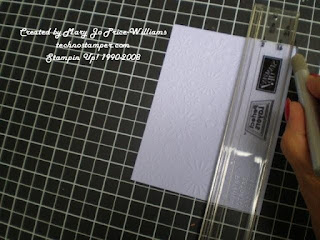
After you have three pieces of card stock embossed you will have to trim them all so that they are identical! This part is important so that they will look lined up in the later steps. So be sure to trim them all the same size and leave the exact same images. This is easier to do with a stamped image but not hard at all this way.


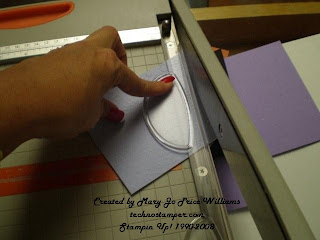
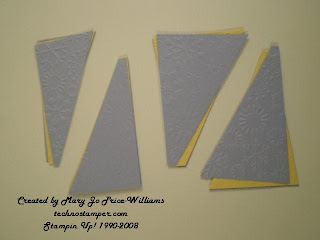
Next you will stack all three pieces of card stock together and cut into your shapes. (you are cutting all three pieces at once) I chose to make four angles shapes from mine. You can do as many as you like. Of course you will need to do at least the three to show all three of your colors. As you cut your stacked card stock be sure to lay it out next to the trimmer as the pieces are cut. This will help you to keep them in the correct order.


This picture shows how you should be setting your cut pieces next to your trimmer. Keep the piles together and keep them in the correct position.


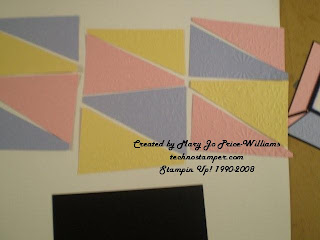
Next you will begin to lay your images out in alternating colors as shown above. You will get three background from this! Hence my 3 for 1 in the math equation.


You can attach these directly to your card base but I like to choose another color of darker card stock to attach them to first. It really makes the background pop! I almost always use black but I am sure it would look good with other colors too --experiment and see what you like.

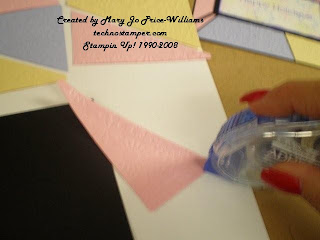
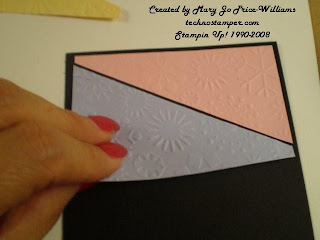
I just apply adhesive to each piece and attach it to the black background leaving a little space between each to help make it pop. You can see this in the photo below.


Now you can attach to your card base and embelish as desired. Here is my finished card again.


The next picture is of a card made using a more traditional form of the technique. Hence my 2x in the math equation. Hope you enjoyed and don't worry there will not be a test!


I did the exact same thing but with a stamped image and used it as my focal point. This works great with background stamps too. Thanks for stopping by today. Hope everyone in the states has a great Thanksgiving And to the rest of you just enjoy your day!

There are only a few days left on my Techno Take-Out!
Make sure you sign up for it. I am giving away a $20 gift certificate for Stampin Up!. Click here to enter.